Tired of being tired?
Showing posts with label Projects. Show all posts

Rosemary Hair Rinse

Recently we trimmed our rosemary bush in our side yard and after making a few firepit bundles to ward off bugs, mainly mosquitos, we still had a lot left over. Brainstorming on how to use them so they didn't go to waste, I decided to create some homemade rosemary hair rinse. It was easier than I thought and I have definitely been enjoying rinsing my hair in the rosemary tea after my shower is over. I've also added a few sprigs bundled together with twine to hang in our shower for a nice scent when we shower.


Rosemary is anti-inflammatory, antioxidant, and vasodilator, meaning it dilates the blood cells. It also helps stimulate hair growth, improves circulation, and soothes the scalp to some degree. Rosemary hair oil has become more popular lately and creating your own rosemary tea will give the same benefits from the rosemary just in a different form. Rosemary tea is great for hair breakage and what I found out while using mine was fuller hair and less oiliness. Of course, these are only my personal experiences with the rosemary tea I created, and everyone's hair is different, but there are no harmful side effects known of rosemary tea. Another added benefit I noticed with daily use was a shiny, more manageable hair to style.

Here is how it's made:

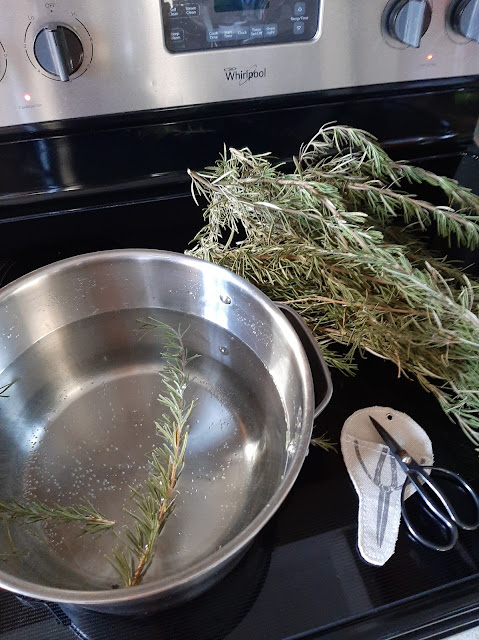
Working in batches, I added the clipped rosemary sprigs from the previous rosemary trimming of our bush to a large stock pot (mine is from IKEA and hold five quarts) and poured 10 to 12 cups of water over the rosemary. I added about 20 sprigs per pot and allowed them to come to a boil.

Once they started boiling I allowed them to remain boiling for about 10 minutes.

The water will slowly start to turn light brown in color. This is where the heat should be turned off. I let the rosemary sit in the water for about 10 more minutes to get the most out of the herb.

Remove the rosemary sprig from the rosemary water and set aside. I used tongs for the large pieces and a slotted spoon for the smaller ones. Allow the rosemary water to cool to room temperature before bottling. Be sure to compost your rosemary scraps, or throw into a brown paper sack and toss on a firepit or campfire. Rosemary helps keeps mosquitos and other bugs at bay.

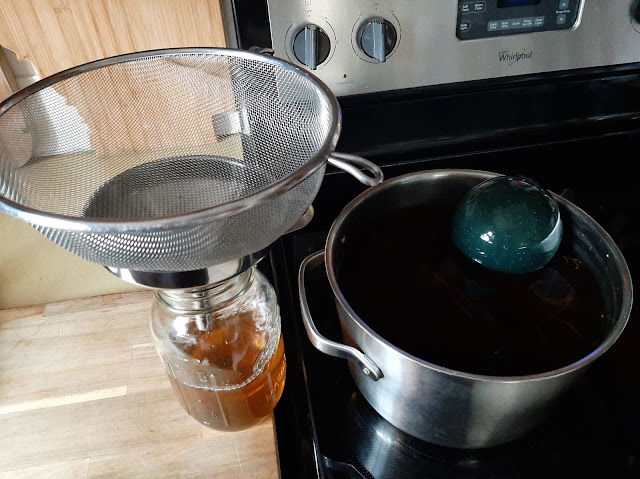
Once cooled place a funnel and a fine mesh strainer over the top of your jars and fill jars as much as you want per jar. I like to leave a bit of space, about two inches at the top of the jar, to help with pouring it into the applicator bottles later. I use an applicator bottle that has a small resealable top on the bottle in the shower to apply it, similar to the one pictured below, but you could pour straight from the jars onto your hair, as well. Store the jars in the refrigerator in the meantime. They will last about a month when refrigerated. The applicator bottle that I keep in my shower, I make sure to use that rosemary hair rinse in about three days and then refill it. I've been doing this rinse for about three months now and I do see a difference. Less hair in the shower drain, less itching, less breakage, etc. Everyone's hair is different, so if you are concerned about truing this on your own hair, speak to your hair stylist, or physician beforehand. Overall rosemary is a safe herb and I just love the benefits of it all the way around, from eating, to topical, to even medicinal, it's a great addition to your routine from head to toe.

            
Amber applicator bottles                        Ball Wide Mouth Jars (32 oz.)

End of May 2020 (1 Second Every Day)

I started at the beginning of May with a 1 sec every day picture/video post. It's fun to look back on the previous month and see what great things happened throughout the month. I like to post them on Twitter, as well, just to share in the good vibes. I plan on sticking with it each month to help with my positive affirmations each month. This is the end of May 2020. You can get the app here and start recording your affirmations each month.

Fog Pictures

 I've always been a horror fan since I can remember. Along with the horror, I've always had an interest in anything "spooky" or "scary" in general. Fog is one of those things. I feel like fog takes you away to some mysterious place, sort of like a dream, maybe. I been so lost in the "fog" most of my life. With seeing things differently than most people and also feeling like I could disappear from life in general through fog, itself. Although fog is nothing more than moisture in the air, collected into one spot, and sits in that spot because of tiny water droplets or ice crystals suspended in the air, with no wind or breeze to push it along. The National Geographic Society states that fog can also be considered a low lying cloud. Whatever "fog" is, it's one of my favorite things in this world. Because of that, I have decided to dedicate an Instagram account to just pictures of fog. You can view that account here, it's under Fog Pictures, and along with that, here's several pictures that I've taken and featured on the page. Fog doesn't get enough credit for being the amazing, and beautiful sight that it is.



From an old t-shirt to a bag

My son quickly outgrows his clothes like he is the Incredible Hulk each year. Along with outgrowing clothes comes the moment that he outgrows his favorite clothes. I've seen the posts on making adult t-shirts into reusable bags, but wasn't sure how well it would work for a child's t-shirt. The Bean not wanting to let go of his favorite Star Wars shirt, I decided to give it a try. It was a hit!

All I simply did was turn the shirt inside out and cut a larger opening in the neck, but it can be left "as is" depending on what your child, or you, carry inside. I then cut off the sleeves and followed the stitching of the sleeve to keep it in from fraying later. I then did a simple straight stitch three times along the bottom of the shirt, which will become the bottom of your bag. And that was it! Really a simple task, even if you're new to sewing.

I plan on making a pocket inside the bag with the leftover sleeves, so that my son can carry small items and not have them get lost in the bottom of the bag.

He was so glad to still have his favorite shirt close, but be able to repurpose it in a new way. I was glad to be able to give him that. He has already used it to carry home books from the library and for his small items he likes to carry from day-to-day. He will really put it to the test on our big trip coming up in May.

Have you ever made a t-shirt into a bag, or anything else?  Let me know in the comments!  I'd love to hear all of the ways a t-shirt can be repurposed.


Make an owl costume

This year for Halloween, The Bean went as an owl.  We have always made it a tradition to make the Halloween costumes and The Bean comes up with some good ones! Even growing up, my own mom made a lot of the costumes that we wore for Halloween night and that tradition seeped over into my adulthood.  Each year, since he was a baby, I have made, sewn, stitched, glued, and sweat over his costume. He has been everything from a jalapeno pepper (when he was a month old), to a cloud (when he was six).  It's sort of "our thing," So this year he decided he wanted to be an owl.

He told me about his costume idea in late August and my mind went to work on how to make it.  I started with an old shawl and worked from there.  From using scrap material that I had on hand, to buying random pieces of material to bring it all together.  The owl transformed slowly and made another Halloween costume go down in our memory books.  Here is a quick, step-by-step on how I created the Halloween owl.

I started the project with two-yards of fabric in a brown, tan-splatter pattern, white fleece from the Max costume last year, black, and a puppy print that had several earth-tone colors in it.

I started cutting 20 long oval pieces from each piece of material.

I tried to use as much as the fabric as I could.

I ended up with a total of 2,500 oval pieces when the cutting ended.

I cut in large, medium, and small pieces to make sure I had enough "feathers" to cover different areas of the costume.


Take about three or four ovals, depending on the thickness of the fabric and fold in half length-wise.

Next, cut diagonal lines through both sides of the fold.

Keep moving up the fold until you reach the top of the material.

Your cuts should look similar to the ones shown.

Unfold the material and you've made a fabric feather.

Your "feathers" should look like this.

Fluff the material to give the "feathers" more fullness.

For the body, I gathered some cotton cloth in white.  I used two-yards of the material and cut a head hole in the top and just plopped it over my son's head.  I left it loose so that way it would blend with the "wings" of the cape.

I hand stitched the neck to make it a bit more gathered around the neck and made it more comfortable to wear.


With the white feathers, I started button stitching each one onto the body.  This is the part that took a bit of time.

Working from the bottom up gave me a chance to use the large feathers and tapper up with the medium and finally the smallest ones.

I started in on the cape once the body was almost finished.

On the cape I used the colored material instead of the white.

I straight stitched one white feather in the middle to mark the spot to stop with one side and start with the other.  I made sure I had the same amount of feathers on each side.

For the mask, I bought a small package of white feather and a small package of brown feathers. 

I used brown foam sheets for the beak.

The feathers can be found in the craft sections of most places.

I used a small plastic Mardi Gras mask for the structure and coated it in Elmer's glue. Then, taking my time, I placed one feather at a time down where I wanted it to go.  I worked across the top, and then around the beak and the sides.  

I left a few feathers going in odd directions.


For the ears, I used a cloth headband, foam sheeting and the white feathers.

I cut a small triangle out of the foam sheet and brought it together and glued it. I then used white glue and placed the feathers around the foam to hide it.

Once everything was dry I cut two small holes on either side of the foam and slide it onto the cloth headband.

The finished owl ears.

I think the mask and the ears came together nicely!


And the Halloween owl is born.